 |
Making the Strips and Tying Them Together
Begin cutting at the top of your sheet. Cut down about 3 inches. Move the scissors over 1.75 inches to create strip width. Tear one side of the strip down the length of the sheet. Tear the next side down the sheet. This makes a strip 1.75 inches wide, the length of your sheet. Continue this process across the width of the sheet. Tip: This is a great way to vent your frustrations. Grab hold, let out a roar and tear it! I suggest doing this when no one else is at home:)
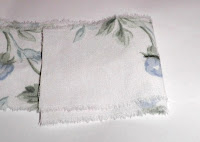
Place two pieces one on top the other.
 Fold the ends and cut a quarter inch slit across the fold in both pieces. Notice the black line in the middle of the fold.
 Open the fold.
Take the top end, fold length wise, pull it back to insert the end into the opposite strip.
Pull each end until the strip forms a knot. Fold each side of the strip holding the excess ends to hold them in place. Tie all of your strips end-to-end. When you are finished, roll into a ball.
I wrap my ball so that the strip will pull from the inside out. The way you would make a ball of yarn from a skein of yarn. You can roll them into a ball so that the strip is pulled from the outside of the ball, also. You need a heavy round bowl or planter to hold the ball in place so that it will not roll around.
Crocheting the Rag Rug
 Chain 4 stitches to form a small ring. You can use anywhere from 3 to 6 chains. If the material weave is tight you may have to use 5 or 6 chains. The loops are pretty tight at this point.
Join the chain with a slip stitch.
Insert the hook into the center of the circle. Hook the strip to pull back through the circle and form a single crochet.
Single crochet through the circle for 7 single crochets. When you get back to the beginning join with a *single crochet, add a second crochet in the same stitch. Repeat from * for the whole round. You should have 16 stitches on your round.


At the beginning of your next round, *single crochet in one stitch adding two single crochets in the next stitch. Repeat from * for the entire round. Row 1
I added safety pins so that I don't have to count. I end up counting anyway. It must be instinctive. The safety pins are placed on each increase (where there are 2 single crochets in one stitch.
Continue this pattern, increasing 8 times, on each row. In this picture you can tell that you are on row 2. You can tell that you are on row 2 by the number of single crochets between the increases (the stitches with two single crochets). There will be two single crochets between the increases.
At the beginning of row 9 single crochet past each increase. Make your new increase three stitches past the increase. Continue this way until the rug is finished.
Finish the last row of the rug with single stitch round, tie off and hide the ends pulling them through the loops on the back.
Sometimes You Must Modify Your Increases
If your rug starts cupping, this means you need make more increases. Just try to keep the increases at even intervals.
If the rug starts to ripple or wave then you have too many increases. To stop this, crochet single stitches without increasing, until the wave stops.
Sometimes you may have to pull the rows out until you get back to where the rug lay flat and begin again.


No comments:
Post a Comment